Hmmm, firstly I apologise for the hiatus in doing these build threads. Just been one of those years.
Anyhow, the mojo is back and let's continue where I left off.
This one is going to be a bit about sewing in general, kite sewing, how I stitch panels etc and whatever else related comes up.
I'll find some time later today to start on this one. If anyone wants a particular aspect covered please ask and I'll see you shortly.
Fractured Axel
Sport, Trick and Freestyle Kite Flying Forum
-

- honchoboy
- Posts: 247
- Joined:
- Location: Leeds, UK
-

- 711jrp
- Posts: 845
- Joined:
- Location: Next door to a crackhouse
Re: NMKG Builds - #3 Let's talk about sewing
Looking forward to it
Pete
Fivers are alive
50% of the dognappers
Fivers are alive
50% of the dognappers
-

-
Hawkerhunter
FA Supporter

- Posts: 276
- Joined:
Re: NMKG Builds - #3 Let's talk about sewing
Great to see you back at the machine Ian.
Steve
In the bag
Talon UL, Talon standard(x2), Talon vented, Talon SUL Prism Q Pro, Elixir, Zephyr, E3, E2, Hypnotist, Nexus, 3D, Micron
http://www.facebook.com/northernmonkeyskitegroup.nmkg
In the bag
Talon UL, Talon standard(x2), Talon vented, Talon SUL Prism Q Pro, Elixir, Zephyr, E3, E2, Hypnotist, Nexus, 3D, Micron
http://www.facebook.com/northernmonkeyskitegroup.nmkg
-

- Lex B
- Posts: 196
- Joined:
- Location: Baarn, The Netherlands
Re: NMKG Builds - #3 Let's talk about sewing
A nice tutorial on how to cover up a @#$%&^@-up (you know what I mean) would be interesting.
remember: amateurs built the ark ..
professionals built the Titanic.
PLEASE......NO TAILS ....
professionals built the Titanic.
PLEASE......NO TAILS ....
-

- woody482
- Posts: 37
- Joined:
- Location: Tamworth.UK
Re: NMKG Builds - #3 Let's talk about sewing
Hi Ian
Looking forward to NMKG Builds learnt so much already much appreciated!
Looking forward to NMKG Builds learnt so much already much appreciated!
-

- jaydub
- Posts: 1228
- Joined:
Re: NMKG Builds - #3 Let's talk about sewing
We need your mojo back ooop North. Must catch up as soon as the situation allows.
-
- honchoboy
- Posts: 247
- Joined:
- Location: Leeds, UK
Re: NMKG Builds - #3 Let's talk about sewing
Lex B wrote:A nice tutorial on how to cover up a @#$%&^@-up (you know what I mean) would be interesting.
Yes I think we can cover that in a future thread, both how to minimize the error from happening and what options are available if it does.
It happens to all of us at some point Lex.
-
- honchoboy
- Posts: 247
- Joined:
- Location: Leeds, UK
Re: NMKG Builds - #3 Let's talk about sewing
I plan on splitting this particular build thread up into parts, each part covering a different aspect of sewing as mentioned above. I may cover some of these parts in video as it can be easier to show something than try to explain in text. If so I will link in as necessary.
I am pretty sure I may have covered some of these things already in different posts but hey-ho.
It is important to remember my ways are not the only ways to accomplish the task of building your own kites. They are just what work for me. I have done things differently in the past but now tend to stick to these methods pretty much all of the time. Other people do things differently... and they make cracking kites. Just have a play around, use what works for you and hopefully you will find your own preferred way to build.
So for the first part we will cover two of the most basic aspects of any kite build. The bits that don't get much attention but without you simply cant sew a kite. They are undoubtedly the cheapest parts of any build but the most important if you are looking for a quality finish. These are the parts that tie everything else together (no pun intended).
You may well already know about all what follows but it is as good a place to start as any.
-
- Lex B
- Posts: 196
- Joined:
- Location: Baarn, The Netherlands
Re: NMKG Builds - #3 Let's talk about sewing
Glue and thread?
remember: amateurs built the ark ..
professionals built the Titanic.
PLEASE......NO TAILS ....
professionals built the Titanic.
PLEASE......NO TAILS ....
-
- honchoboy
- Posts: 247
- Joined:
- Location: Leeds, UK
Re: NMKG Builds - #3 Let's talk about sewing
Part one: Needle and thread
Ok, depending on what kite related thing I'm building I might change as necessary but 99% of the time I stick with the same kind of needles, same kind of thread, and the same machine (I am guilty of owning 3 but only ever use 2 of them).
Let us start with the thread.
The reality is you could use any kind of thread and end up with a kite. However, some threads are better than others and better is always worth aiming for. For a start you could just use cotton thread and it would look ok. However I strongly advise that you don't. Kites are meant to be flown, and in the UK we get a lot of rain, hence wet kites. Salt water and beaches are even worse. Cotton can't handle these elements and will rot over time. It just does not have the longevity that we want to be pursuing. Why invest many hours into making a kite for it to then fall apart on you down the line?
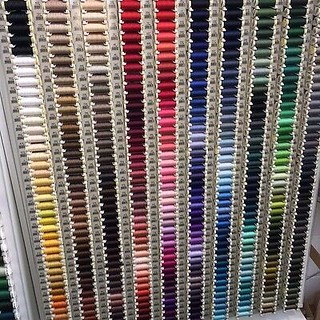
For this reason a polyester thread is the way to go. I have used a few different brands of polyester thread over the years and have fully settled on Gutermann Sew-All thread which is 100% polyester.

I wouldn't even consider using anything else now. It is bloody good stuff: available as 100m, 250m, 500m, or even 1000m lengths (Kilometre of sewing anyone?). It is easy to work with, available in all colours of the rainbow, not 'fluffy', has a nice weight to it, never snapped on me, sold in most sewing and craft shops and is a fair price. I really have nothing negative to say about it. I use it whatever kite and whatever kite sleeve I am making. If you are seeking to use a thread that matches the colour of the fabric panel then I am confident you will find a good enough colour match.
The only time I use a different thread (still Gutermanns but a heavier weight variant) is if I am building a kite bag to hold a bunch of kites in their respective sleeves - another topic for a different day; possibly the next build thread as I need another bag
As for needles there is a bit more of variability. At its simplest level needles come in not only different sizes i.e thickness (think of the size hole it leaves in the fabric when punching through) - but also 'varieties'.
By varieties I kind of mean the shape of the sharp bit at the end of the needle.
For example: you can get denim or 'sharp' needles (as the name suggests these are very sharp and designed primarily for heavier weight fabrics and pierce through the weave), ballpoint needles (they have a more rounded end which separates the weave as it goes through - useful on more open weave fabrics), and Universal needles (really a combination of the 2 above).
There is another kind of needle called a Microtex needle that really interests me - I will be doing some more experimenting with these shortly and post the results - so far so good; (they have an acute point and are designed for working with more 'modern' materials such as polyesters and coated materials)...Are you thinking Icarex???

Anyhow. as of now, my advice is go with the Universal needles. They will not let you down for the majority of materials you will use. Simple.
Now the more interesting consideration of this topic is the size of the needle. The needle size needs to match the weight of the thread. You will have nowt but dropped stitches if you tried to use a fine needle with a thread which has a heavy 'weight' (ok so not 100% accurate but you could think of the 'weight' as the thickness of the thread). To understand why the size needs to match the weight let us briefly consider how a machine needle kind of works

When the machine runs:
So let us return to the 'needle size needing to match the weight of the thread'. On the whole we want to use the smallest size needle we can get away with for the material we are using. Think of this as the size of the hole we will be punching in the sail - we are not intending to make perforations - just a hole big enough for the thread to go through. If you use a fine needle with a fat thread the hole just isn't big enough and can lead to dropped stitches. Now consider the opposite; a fat needle with a fine thread - you are unlikely to drop a stitch as the thread can pass easily through but damn...those holes look nasty when held up to the sky - we are trying to make a kite not a doily.
So its like Goldilocks porridge, you want a happy medium - the smallest needle that can accommodate the thread and get through the materials without dropping stitches.
So what size needle do I use? For the majority of the sail (all of the sail panels for sure) I use a size 11 needle. I sometimes use smaller but find a size 11 to be dependable on my machine (Please note that your machine may be happy going with a smaller size needle so experiment as you see fit!). I end up with a nice small hole, it matches well to my preferred thread weight and 99.9% of the time gives me no dropped stitches. In areas where I am going through heavier materials & multiple layers (reinforcements, nose etc) I may go up a bit in needle size, say a 14 or 16 sometimes, but again, only as much as is needed. This can be deducted through test pieces, of which we will dedicate a full part in this thread to discuss further.
As for what brand of needle then? Lets be clear - we are only talking about something that costs a few pounds but there are good needles and bad needles. Do not buy the cheapest in the store. I really like the Schmetz brand. Superb needle every single time. My number one for sure. You will not go wrong if you can purchase these. A second choice would be Klasse. But...I have had it quite a few times with these where a spanking new needle was defected and just dropped stitches immediately. Therefore I am a bit more wary of this brand of needle.
Number one choice:

Number two choice:

Now this reminds me of very important point which I will end this part with for tonight.
IMO the vast majority of cases where your machine is just messing up, dropping stitches etc. the problem is either the needle or the thread, likely the former. Change the needle, and remember; just because that one is now new doesn't mean it isn't defected! - and also check it is inserted with the flat point being the correct way in the arm. If the problem persists then question the thread - is it missing a guide between the eye and the bobbin? If it still persists - are you using an adhesive tape as opposed to a glue to hold materials together? I personally really dislike tape and had a world of problems when using it in the past (We will look into this area in another build thread). If the problem still persists then I would be looking at tensions and so on. But my bet is the majority of problems disappear with the change of needle or thread.
That is all for part 1 of this particular build thread. In part 2 we will briefly look at the basics of a sewing machine, how to set it up correctly for kite building, and discuss stitches that are commonly used.
Ok, depending on what kite related thing I'm building I might change as necessary but 99% of the time I stick with the same kind of needles, same kind of thread, and the same machine (I am guilty of owning 3 but only ever use 2 of them).
Let us start with the thread.
The reality is you could use any kind of thread and end up with a kite. However, some threads are better than others and better is always worth aiming for. For a start you could just use cotton thread and it would look ok. However I strongly advise that you don't. Kites are meant to be flown, and in the UK we get a lot of rain, hence wet kites. Salt water and beaches are even worse. Cotton can't handle these elements and will rot over time. It just does not have the longevity that we want to be pursuing. Why invest many hours into making a kite for it to then fall apart on you down the line?
For this reason a polyester thread is the way to go. I have used a few different brands of polyester thread over the years and have fully settled on Gutermann Sew-All thread which is 100% polyester.
I wouldn't even consider using anything else now. It is bloody good stuff: available as 100m, 250m, 500m, or even 1000m lengths (Kilometre of sewing anyone?). It is easy to work with, available in all colours of the rainbow, not 'fluffy', has a nice weight to it, never snapped on me, sold in most sewing and craft shops and is a fair price. I really have nothing negative to say about it. I use it whatever kite and whatever kite sleeve I am making. If you are seeking to use a thread that matches the colour of the fabric panel then I am confident you will find a good enough colour match.
The only time I use a different thread (still Gutermanns but a heavier weight variant) is if I am building a kite bag to hold a bunch of kites in their respective sleeves - another topic for a different day; possibly the next build thread as I need another bag
As for needles there is a bit more of variability. At its simplest level needles come in not only different sizes i.e thickness (think of the size hole it leaves in the fabric when punching through) - but also 'varieties'.
By varieties I kind of mean the shape of the sharp bit at the end of the needle.
For example: you can get denim or 'sharp' needles (as the name suggests these are very sharp and designed primarily for heavier weight fabrics and pierce through the weave), ballpoint needles (they have a more rounded end which separates the weave as it goes through - useful on more open weave fabrics), and Universal needles (really a combination of the 2 above).
There is another kind of needle called a Microtex needle that really interests me - I will be doing some more experimenting with these shortly and post the results - so far so good; (they have an acute point and are designed for working with more 'modern' materials such as polyesters and coated materials)...Are you thinking Icarex???
Anyhow. as of now, my advice is go with the Universal needles. They will not let you down for the majority of materials you will use. Simple.
Now the more interesting consideration of this topic is the size of the needle. The needle size needs to match the weight of the thread. You will have nowt but dropped stitches if you tried to use a fine needle with a thread which has a heavy 'weight' (ok so not 100% accurate but you could think of the 'weight' as the thickness of the thread). To understand why the size needs to match the weight let us briefly consider how a machine needle kind of works
When the machine runs:
- step 1. is that the machine punches down and the point of the needle begins to creates the necessary hole. Take a second to note where the thread is going through the eye of this needle - on a sewing machine needle the eye is just above the point (Unlike on a hand needle where the eye is on the end).
- step 2. is where the needle continues dropping the thread and thus is carried through the opening of the hole.
- step 3. As the needle is driving through the fabric the carried thread will lie into the groove and thus not protrude from the overall thickness of the needle. Therefore it is carried without obstruction.
- step 4. is where the top thread interlocks with the bottom thread and some magic happens below(we will come back to this later).
- step 5. is then where the needle withdraws from the fabric (again with the thread laying within the groove), reveals the stitch and is now ready to repeat the process.
So let us return to the 'needle size needing to match the weight of the thread'. On the whole we want to use the smallest size needle we can get away with for the material we are using. Think of this as the size of the hole we will be punching in the sail - we are not intending to make perforations - just a hole big enough for the thread to go through. If you use a fine needle with a fat thread the hole just isn't big enough and can lead to dropped stitches. Now consider the opposite; a fat needle with a fine thread - you are unlikely to drop a stitch as the thread can pass easily through but damn...those holes look nasty when held up to the sky - we are trying to make a kite not a doily.
So its like Goldilocks porridge, you want a happy medium - the smallest needle that can accommodate the thread and get through the materials without dropping stitches.
So what size needle do I use? For the majority of the sail (all of the sail panels for sure) I use a size 11 needle. I sometimes use smaller but find a size 11 to be dependable on my machine (Please note that your machine may be happy going with a smaller size needle so experiment as you see fit!). I end up with a nice small hole, it matches well to my preferred thread weight and 99.9% of the time gives me no dropped stitches. In areas where I am going through heavier materials & multiple layers (reinforcements, nose etc) I may go up a bit in needle size, say a 14 or 16 sometimes, but again, only as much as is needed. This can be deducted through test pieces, of which we will dedicate a full part in this thread to discuss further.
As for what brand of needle then? Lets be clear - we are only talking about something that costs a few pounds but there are good needles and bad needles. Do not buy the cheapest in the store. I really like the Schmetz brand. Superb needle every single time. My number one for sure. You will not go wrong if you can purchase these. A second choice would be Klasse. But...I have had it quite a few times with these where a spanking new needle was defected and just dropped stitches immediately. Therefore I am a bit more wary of this brand of needle.
Number one choice:
Number two choice:
Now this reminds me of very important point which I will end this part with for tonight.
IMO the vast majority of cases where your machine is just messing up, dropping stitches etc. the problem is either the needle or the thread, likely the former. Change the needle, and remember; just because that one is now new doesn't mean it isn't defected! - and also check it is inserted with the flat point being the correct way in the arm. If the problem persists then question the thread - is it missing a guide between the eye and the bobbin? If it still persists - are you using an adhesive tape as opposed to a glue to hold materials together? I personally really dislike tape and had a world of problems when using it in the past (We will look into this area in another build thread). If the problem still persists then I would be looking at tensions and so on. But my bet is the majority of problems disappear with the change of needle or thread.
That is all for part 1 of this particular build thread. In part 2 we will briefly look at the basics of a sewing machine, how to set it up correctly for kite building, and discuss stitches that are commonly used.
-
-
Andy S
King of FA
- Posts: 8218
- Joined:
- Location: In my house
- Contact:
Re: NMKG Builds - #3 Let's talk about sewing
Wow.. awesome write up! Looking forward to part 2. (Even though I have no intentions of making a kite any more.)
-
- Lex B
- Posts: 196
- Joined:
- Location: Baarn, The Netherlands
Re: NMKG Builds - #3 Let's talk about sewing
Ian is right! He told everything that my wife also told me.
I guess I'm lucky. I didn't have to choose a brand of thread or needles. I just use my wife's. (And occasionally buy her new.....)
I guess I'm lucky. I didn't have to choose a brand of thread or needles. I just use my wife's. (And occasionally buy her new.....)
remember: amateurs built the ark ..
professionals built the Titanic.
PLEASE......NO TAILS ....
professionals built the Titanic.
PLEASE......NO TAILS ....